In this discussion, dead pixels are defined as pixels that do not react to light at all. There are two types of dead pixels :
– Stuck at “1”, or pixels that are always saturated (white defects),
– Stuck at “0”, or pixels that are always empty (black defects).
The location of dead pixels can be of importance in the case defect pixel correction algorithms will be used in the camera, and in the case these algorithms rely on a priori knowledge of the defect pixel coordinates. The technique to find the location of dead pixels is very simple : because the defect pixels do not react to light, they show a pretty low value for the temporal noise under light conditions. So what can be done is the following :
– grab several images (e.g. 100), with sufficient light on the sensor to fill the pixels to a level of (about) 50 % of saturation,
– calculate on pixel level the temporal noise that the pixels demonstrate in the images grabbed,
– rank all pixels according to the calculated noise, the pixel with the lowest noise level comes first. If this noise level is close to zero, the pixel is most probably a dead pixel,
– track the value of these suspected dead pixels over the frames grabbed.
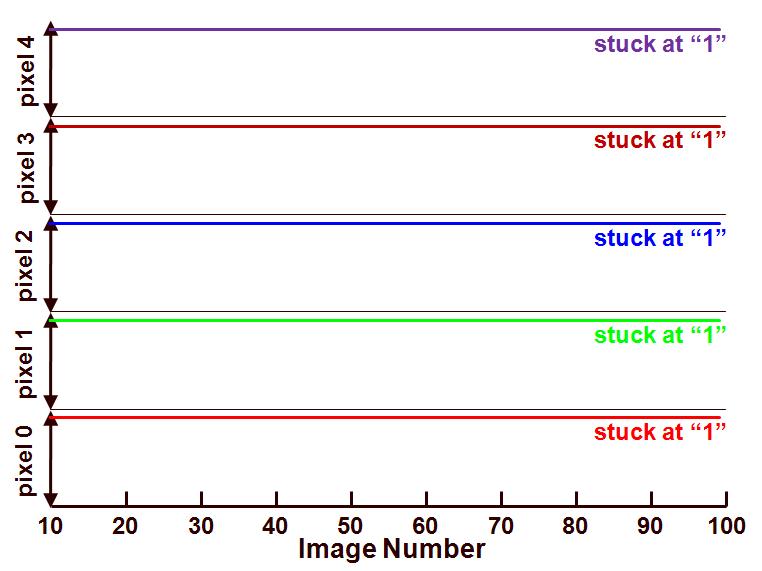
The result of this exercise is shown in the Figure 1 (the images used for this measurement is different from the data used in previous blogs).
Figure 1 : Behaviour of a first group of five dead pixels as a function of time.
The test images are taken with an exposure time of 20 ms. On the horizontal axis the number of the image grabbed is shown (this can be seen as a time axis), and on the vertical axis the value of 5 dead pixels is shown. (The pixel with the lowest number shows the lowest temporal noise.) All five pixels shown demonstrate a noise level almost equal to 0 DN because all five pixels are fully saturated.
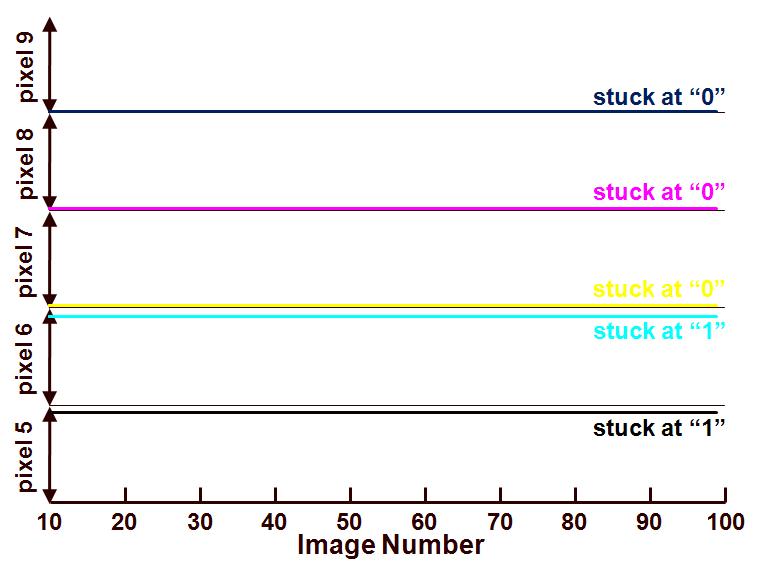
Another group of five pixels is shown in Figure 2.
Figure 2 : Behaviour of a second group of five dead pixels as a function of time.
In Figure 2, two more “white” pixels are shown, but also three “black” defects. Although not visible in this graph, the temporal noise of the black pixels is not 0 DN, it still contains the noise of the output stage and the ADC. This is not necessarily the case for the “white” defects, because they can be clipped by the ADC.
A final remark : this noise-based method to localize defect pixels cannot be used to find the “sick” pixels. The latter ones are defined as pixels with a much larger or much smaller sensitivity than the average sensitivity of the sensor. Because sick pixels still react to light, they can be found as being the outliers in the histogram of all pixels with light input.
Albert, 17-10-2012.


“How To Measure Dead Pixels ? ? Harvest Imaging
Blog” was indeed a pretty good blog, . Continue composing and I’ll try to continue reading! Regards ,Maximo
Albert,
A White Pixel is due to the saturated dark currents, which is again due to the presence defects (metal contamination) in the photodiode region. What kind of bulk/process induced metals gettering techniques that Image Sensing Manufacturers employ to lower the White Pixel counts?
Can you shed light on this?
There are two types of pixels such as Dead and stuck ones. If you want to spot such pixels on the screen, then RGB is the best way to go for. You can implement this test by pressing on the color options behind the desktop. these color option available white screen.
Amazing blog..keep it up..